How to Refresh Existing Content with Content Optimizer?

Optimize your existing blog posts to get more value out of them.
Even the best content doesn’t stay relevant forever. Search trends shift, competitors update their pages, and AI algorithms continue to evolve. To keep your content performing, regular updates are essential — and that’s where Scalenut’s Content Optimizer becomes a game-changer.
Instead of rewriting from scratch, you can use the Content Optimizer to identify gaps, update outdated sections, improve SEO and AI-readiness, and bring your old content back to life.
In this guide, we’ll walk you through the exact steps to refresh your existing content using Scalenut’s Content Optimizer — so it stays competitive, relevant, and discoverable.
STEP 1
From your Scalenut dashboard, click on ‘Content Optimizer’ located in the left panel under Action Center.

STEP 2
On the redirected ‘Content Optimizer’ screen, enter your primary and secondary keywords along with the target audience location. You can add the blog URL now or skip it and input it later in the Editor.
Click ‘Optimize’, and the Content Optimizer will scan top-ranking URLs to generate a Content Score — a smart metric that measures optimization for both search engines and AI systems.
For more accurate benchmarking, you can choose to analyze the top 10, 20, or 30 ranking pages based on your needs.

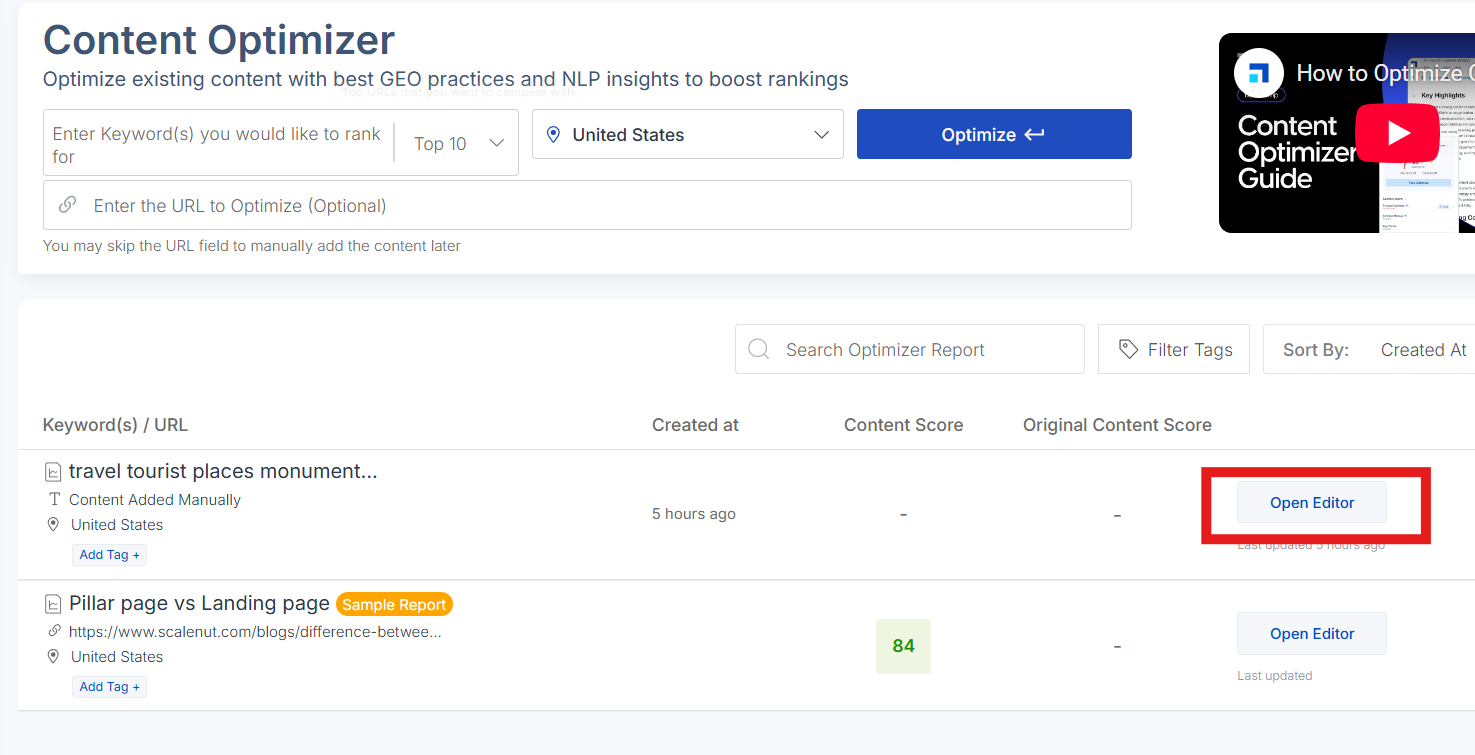
STEP 3
On the Content Optimizer screen, you’ll see a list of your existing articles along with their associated keywords/URLs, creation dates, and current Content Scores.
To refresh an existing piece, simply select the article you want to update and click ‘Open Editor’ to begin the optimization process.
STEP 4
Once you enter the Editor, you'll find your existing content's Meta Title, Meta Description, URL Permalink, and Schema at the top left — all ready for review and updates.
On the right side, under the ‘Optimize’ section, you’ll see the Content Score, which reflects how well your content is optimized for search engines and AI systems. At the bottom, you’ll also find your content’s Readability Score and Word Count, helping you track overall clarity and content depth as you refresh.

STEP 5
The Content Score gives you a real-time evaluation of how well your content is optimized — not just for search engines, but also for AI-driven platforms. This score is calculated based on multiple key parameters, including:
Key Terms: Measures the presence and usage of important keywords (including NLP terms from top-ranking content).
Prompt Coverage: Evaluates how well your content addresses the intent defined in your context.
Meta Tags: Checks the relevance and optimization of your meta title and description.
Heading (H1) and Headings (H2–H6): Analyzes structure and hierarchy of your content’s headings.
Schema Markup: Verifies if the content has proper structured data for better search and AI understanding.
Featured Snippet: Assesses how well your content is positioned to appear in Google’s featured snippet section.
Links: Checks for proper internal and external linking.
URL Structure: Ensures your permalink is clean, relevant, and optimized.
Each parameter is color-coded: Green means it's optimized | Orange indicates minor issues | and Red shows critical areas needing improvement.

STEP 6
The ‘Fix It’ feature is designed to simplify your optimization process by offering instant, guided improvements. Instead of manually reviewing every issue, you can click ‘Fix It’ to receive real-time suggestions tailored to each parameter — whether it’s missing key terms, weak meta tags, or structural gaps.
It walks you through the necessary changes, helping you enhance your content faster and more efficiently — without compromising on quality or performance. It’s the perfect tool for speeding up the refresh process while ensuring your content remains search and AI-friendly.

STEP 7
In addition to the Content Score and Word Count, you can track the Readability Score from the bottom panel. This score reflects how easy your content is to read by analyzing sentence length, word choice, and overall structure.
A higher score means your content is easier to understand, while a lower score suggests it may need simplification for better clarity and engagement.

STEP 8
Short on time to manually adjust your content? Scalenut’s Auto-Optimize feature takes care of it for you. With just one click, it automatically applies essential enhancements to improve your content’s structure, keyword usage, and overall performance.
Let the system do the heavy lifting — so you can focus on strategy and creativity.

STEP 9
Here’s how the Auto-Optimizer screen looks like: Before the tool begins making changes, you’ll see the Article Configuration screen where you can customize how Auto-Optimize works for your content. From this panel, you can:
Include Topic Gaps based on up to 3 reference URLs
Add or manage Key Terms to ensure semantic relevance
Automatically fix Meta Tags including title, description, and URL slug
Fix Image Alt Text for better accessibility and SEO
Enable Internal Linking by selecting your domain for relevant suggestions
Once your preferences are set, click ‘Optimize Outline’ to proceed. This step ensures Auto-Optimize works in line with your goals — delivering a cleaner, more GEO-friendly, and AI-ready version of your content. Want a walkthrough of the feature? Read Here

STEP 10
Now, get back to the original editor of the article, and head over to the Gaps/Gains section.
Gaps identify important topics your top competitors have covered but are missing from your content. Addressing these helps align your content with industry benchmarks and improves overall relevance.
Gains surface unique angles or topics that competitors haven't touched — giving you the opportunity to add fresh, original value that can boost your SEO and attract a wider audience.
Want to dive deeper? [Read Here]

STEP 11
The Research tab offers insights from top-performing pages to strengthen your content. It includes sections like Key Terms, Competition, Questions, Statistics, and more.
In the Key Terms section, you’ll see important keywords used by competitors, along with their usage and relevance scores. You can sort, highlight, or add them directly using the “Add Keyterms” button.
This helps improve your content’s SEO, depth, and AI discoverability.

STEP 12
As a Pro/Growth Plan user, you can access the Interlinking feature directly within the editor. It recommends relevant internal links from your domain, helping you improve SEO, enhance site structure, and keep readers engaged longer.
To get the best results, make sure your domain is set or updated — this ensures the suggestions are based on your live content.
Interlinking is a powerful way to boost discoverability and guide users through your content journey.
Want a step-by-step walkthrough? [Check out our Interlinking guide here].

STEP 13
To improve the tone and readability of your content, use the Detect and Humanize feature available at the top of the editor.
It scans your text for sections that may sound robotic or overly AI-generated and provides instant suggestions to make them more authentic, conversational, and human-friendly.

STEP 14
Here’s how the Detect and Humanize screen looks once you enter the mode: The interface is divided into two panels — Original Text on the left and Humanized Text on the right.
Your content is automatically analyzed and rewritten in a more natural, conversational tone. You can scan your original content using the “Scan” button, then apply changes by clicking “Humanize.” Once satisfied, click “Export to Editor” to take your refined content back to the editor for further editing or publishing.
At the bottom, you’ll also see a helpful indicator that estimates the percentage of AI vs. human-written content — helping you ensure your final output sounds more authentic and reader-friendly. Curious to learn more? Read our guide on the Detect and Humanize feature.

STEP 15
Scalenut's editor now makes collaboration and content management effortless.
With Version History, you can easily track all changes, view previous versions, and revert edits when needed — so nothing important is ever lost.
The Comment section allows for seamless teamwork. Share real-time feedback, leave suggestions, and collaborate directly within the content — perfect for teams working together on content refresh and optimization.
