How to Integrate GEO Watchtower with Cloudflare for AI Traffic Monitoring

How to Integrate GEO Watchtower with Cloudflare for AI Traffic Monitoring
To enable AI Traffic Monitor in GEO Watchtower, you’ll need to securely connect your website to your Cloudflare account. This integration helps GEO Watchtower detect and analyze visits from popular AI bots — including ChatGPT, Perplexity, Claude, Gemini, and others — so you can understand how Large Language Models (LLMs) interact with your website content.
Important: Connecting with Cloudflare is required to activate the AI Traffic Monitor feature.
What you’ll need before you start
Before connecting GEO Watchtower with Cloudflare, make sure you have:
• An active Cloudflare account
• Your website added and active on Cloudflare
• Admin or Owner access to approve integrations
Step 1: Access AI Traffic Monitor
Log in to your Scalenut account.
Open GEO Watchtower from the left navigation panel.
Click on the AI Traffic Monitor tab.
Click on the Cloudflare button to start the integration process.

A popup will appear on your screen prompting the next step.

At this point, head over to your Cloudflare account to continue the setup process for securely connecting your domain with GEO Watchtower.
Step 2: Sign In to Cloudflare
A secure Cloudflare login window will open.
Enter your Cloudflare account credentials.
Complete any 2FA verification if you have it enabled.

Step 3: Ensure Your Domain Is Proxied via Cloudflare
In your Cloudflare dashboard, open the DNS settings for the domain you're integrating.
Look for your A, CNAME, or similar records. There will be a small cloud icon next to each.
Make sure the cloud icon is orange, indicating the record is “Proxied” through Cloudflare.
If it’s grey (“DNS only”), click it to toggle it to orange.
This ensures all traffic—including visits from AI bots—passes through Cloudflare’s servers, allowing the AI Traffic Monitor to intercept and log these interactions properly.

Step 4: Create an API Token in Cloudflare
You’ll need an API token to securely link your domain with GEO Watchtower through Cloudflare. Here’s how to set one up:
Go to the API Tokens page in your Cloudflare dashboard.
Click Create Token.

Select the Use template in "Edit Cloudflare Workers" and follow the prompts to create and copy your API token.

Step 5: Configure Token Permissions
After clicking Use Template, you'll be taken to the token configuration screen.
Look for the Permissions section.

Remove all default permissions by clicking the X buttons, except for:
Worker Routes
Worker Scripts
It should look like this:

Scroll down to the Account Resources section and select your Cloudflare account from the dropdown.
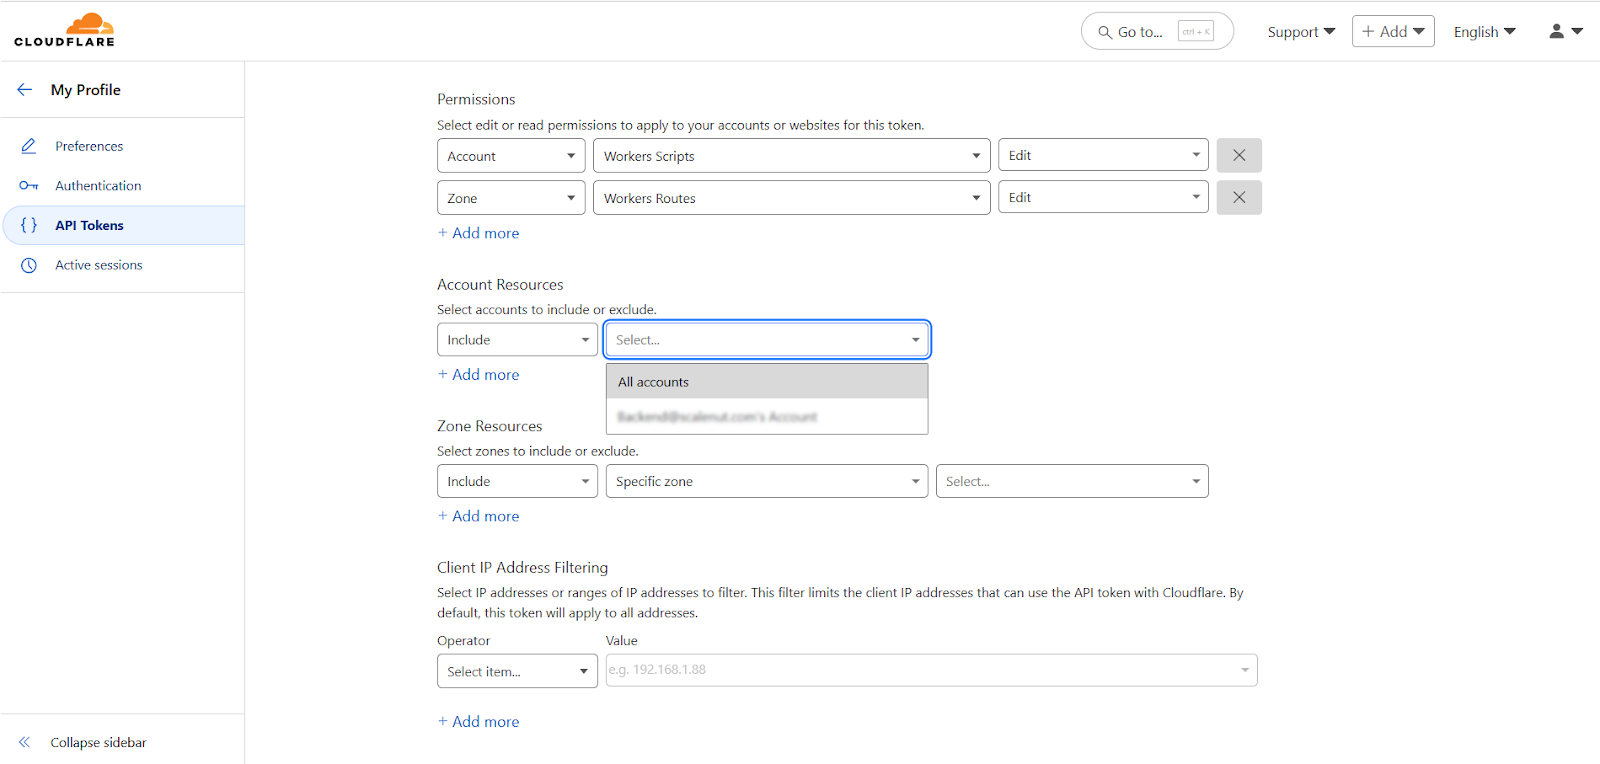
Under Zone Resources, choose the domain where you want to install AI Traffic Monitor.

Scroll down and click on “Continue to Summary”

Step 6: Create and Copy Token
After reviewing the permissions, click on Continue to Summary — this will take you to the final screen to generate your token.
Click on Create Token to finalize the setup.

On the next screen, click the Copy button to copy your API token.

Important: This is the only time the token will be visible, so make sure to save it securely.
Step 7: Complete Setup in GEO Watchtower
Head back to GEO Watchtower in your Scalenut dashboard.
Paste your copied API token into the field provided and click Continue.

On the next screen, select your Cloudflare account and Cloudflare zone from the dropdowns.
Once selected, the Route Path will be auto-filled.

Click on the Continue button.
Your analytics setup will be deployed in just a few seconds!
