Detect and Humanize - Overview and Working

The feature scans for AI-written content and provides you with the option to humanize it, making your content more natural and relatable.
Introducing the improved “Detect and Humanize” add-on in Scalenut’s GEO Core.
As Scalenut transitions from traditional SEO to a more powerful Generative Engine Optimization (GEO) platform, we continue to strengthen the tools that empower content teams to thrive in an AI-first landscape. One such essential enhancement is the upgraded “Detect and Humanize” module—a core add-on designed to help you strike the perfect balance between machine efficiency and human relatability.
Whether you're optimizing for AI engines or enhancing content discoverability across human-centric platforms, Detect and Humanize ensures your message lands with impact—without sounding robotic.
What does the Detect and Humanize feature do?
Scans for AI-written content and gives you the ability to transform it into human-sounding, natural copy—instantly.
Key Benefits in the GEO Workflow:
Authenticity that Connects: Make your content sound more human, emotional, and relevant—crucial for both AI and human engagement across platforms.
Enhanced Engagement: Improve tone, flow, and readability to keep your audience reading—especially important as AI engines now favor natural, conversational content.
Workflow Flexibility: Seamlessly toggle between AI-generated and humanized versions of your copy, based on your brand voice and campaign goals.
Time-Saving Efficiency: Refine your AI drafts in seconds. No need to rewrite—just detect, tweak, and publish.
As part of Scalenut’s GEO Core, this improved module plays a vital role in helping brands produce content that’s not only optimized for search engines but discoverable across generative engines like ChatGPT, Gemini, and more.
Want to know how the Detect and Humanize Add-on works? Here’s how-
STEP 1
Head over to your Scalenut Dashboard and click on view all, available on your left navigation panel, under the Apps section.

When you click on View All, a Manage Apps modal opens. From this modal, you can see a list of all available apps. Simply locate and click on Detect and Humanize to access it.

STEP 2
On the redirected screen, click on the plan of your choice.

STEP 3
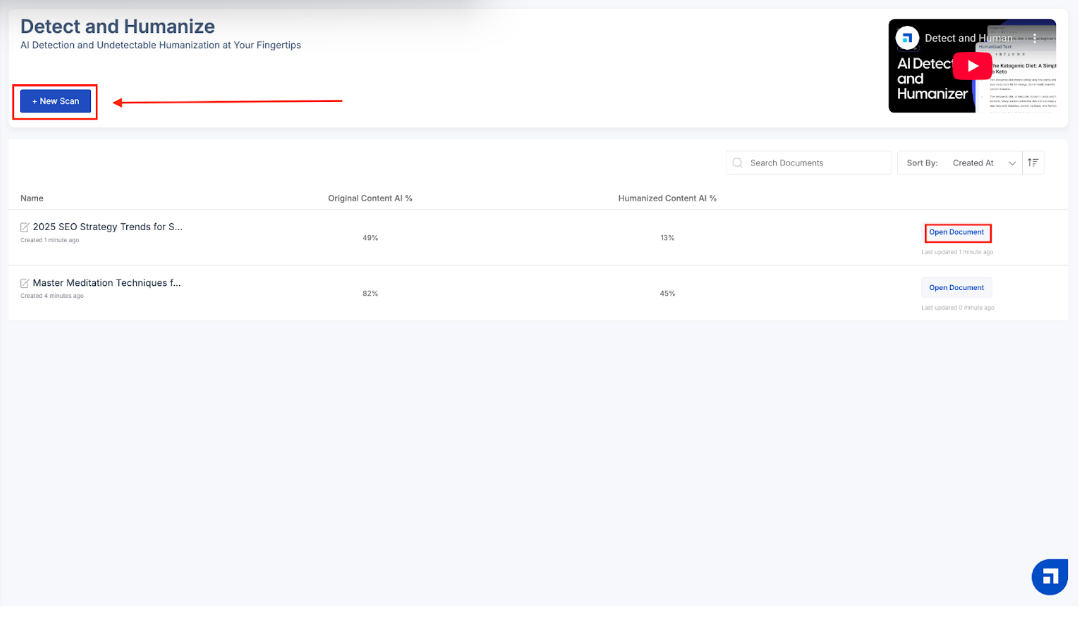
You’d then be redirected to the ‘Detect and Humanize’ section. To check for any new content, click on ‘New Scan’. In case you want to work on a content which you’ve already checked before, simply click on ‘Open Document’ available beside the name.
STEP 4
For new content, on the redirected screen, you’ll find the pen icon on top to add/edit the name. In this case, we’d name it ‘Beginners Guide to Content Marketing Strategies’.

STEP 5
On the left side, you can paste the original text of your choice. Or, even write the content here if you wish. You can also use the toolbar to make any formatting changes.

STEP 6
To check your content for AI detection, click on ‘Scan’. Our system will then check your content and display the percentage of AI content.
Please note: To check, you’d need to put at least 250 characters.

STEP 7
To make the content human-like, click on ‘Humanize’. Our system will then work on the given content and display a changed version of it. You can also use the toolbar to make any formatting changes.

STEP 8
Once humanized, you’ll find the changed version on the Humanized Text field.
You can also see the new percentage of AI detection below. You can also copy the entire changed version by clicking on the ‘Copy’ icon available on the top-right. If required, you can also make manual edits here and check again by clicking on ‘Scan’.

PLEASE NOTE:
Once you’ve humanized the content, you cannot edit the original text. If you want to make any edits to the original text, you’d have to create a new scan document by clicking on ‘Yes Proceed’.

If you wish to directly utilize the ‘Detect and Humanize’ feature, here’s how -
Article Writer/Cruise Mode
STEP 1
For an already written article, simply head over to the module, select the article and click on its Status. In this case, Editing in Progress.
Please note: If it is a new article you are working on, the option will be visible to you on the GEO AI editor screen.

STEP 2
Click on ‘Detect and Humanize’.

STEP 3
On the redirected screen, you will find the original text and the humanized text field. Editing the original content is not allowed in ‘Detect and Humanize’ mode. You can use the main GEO AI editor to make changes.

STEP 4
Scan your original text to check the AI-written percentage.

STEP 5
On this step, if you are satisfied with the AI-content written percentage, click ‘Back to Editor’. If not, you can continue with humanizing your text. Simply click on ‘Humanize’.

STEP 6
Once satisfied with the output, simply click on ‘Export to Editor’.

STEP 7
Once you click on ‘Export to Editor’, you will either get a choice to ‘Append’ or ‘Replace’ your original text.

CONTENT OPTIMIZER
STEP 1
For an already written article, simply head over to the module, select the article and click on its Status.
Please note: If it is a new article you are working on, the option will be visible to you on the editor screen.

STEP 2
On the redirected screen, you will find the original text and the humanized text field. Click on ‘Scan’ to check for AI detection.

STEP 3
In this case, the system detected AI content. You can leave it as it is, or click on and ‘Humanize’ to make changes.

STEP 4
Once done, click on ‘Export to Editor’

STEP 5
Once you click on ‘Export to Editor’, you will either get a choice to ‘Append’ or ‘Replace’ your original text.

Detect and Humanize turns robotic AI content into natural, relatable language—helping you build trust, increase engagement, and stay visible across search and generative platforms.
Don’t just publish—humanize and get found.